











An integrated sink countertop combines the basin and the surrounding work surface into one coordinated assembly. Instead of a separate sink rim sitting on the counter, the surface continues into the bowl or meets it through a closely finished joint. On a bathroom vanity, this gives you a washing area and a place for toiletries in the same top.
The word “integrated” describes that relationship, not one manufacturing method. A molded vanity top, a bonded solid-surface bowl and a basin fabricated from stone panels can all be sold under this name. They may look similar from across the room, but the joints, internal corners and repair options differ. Understanding how the bowl connects to the top is more useful than choosing from the label alone.
Start with the transition from countertop to bowl
Picture a white bathroom vanity with a rectangular basin recessed into its middle. The horizontal surface around the basin is the countertop, sometimes called the deck. The bowl is the hollow washing area; its walls lead down to the drain. An integrated design makes these two parts read as one continuous surface.
Look closely at the opening. In a formed top, a rounded shoulder can flow from the deck into the bowl without a separate rim. In a fabricated assembly, that transition may contain a carefully finished joint. The distinction matters because an uninterrupted-looking surface is not necessarily a single piece of material.
Now compare it with a white ceramic basin installed underneath a white stone counter. From a distance, the matching colours might look integrated. Up close, you can see the stone cutout edge, the ceramic beneath it and the sealed connection between them. Matching colours alone do not tell you how the sink is built.
A photograph from above helps you judge appearance. A close-up of the bowl edge and a view underneath help explain the construction. Those details also show whether a thick-looking front is the actual countertop thickness or a separate built-up edge.

How an integrated sink countertop is made
Formed tops: the bowl shape is built into the surface
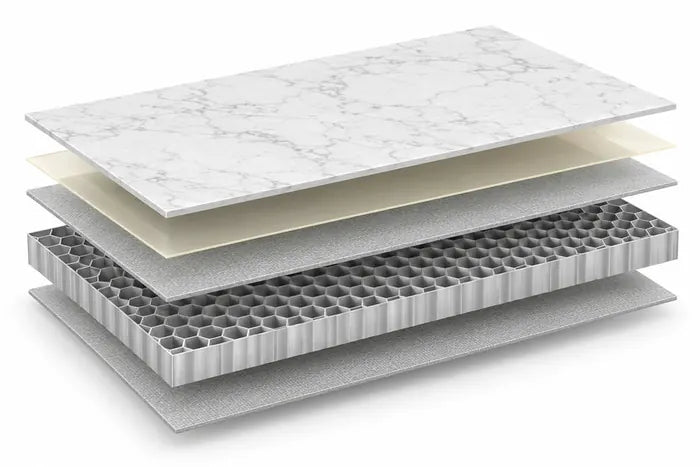
A formed vanity top has a basin shape created during manufacture. Depending on the material and production system, this can involve casting into a mold or forming a suitable material into a curved bowl. The shape is established before the completed top reaches the bathroom.
This approach is useful when you want rounded internal corners and a consistent basin shape across several bathrooms. A standard bowl can be combined with more than one overall top size. That is why a longer countertop does not automatically give you a larger washing area: the additional length may simply become more space beside the bowl.
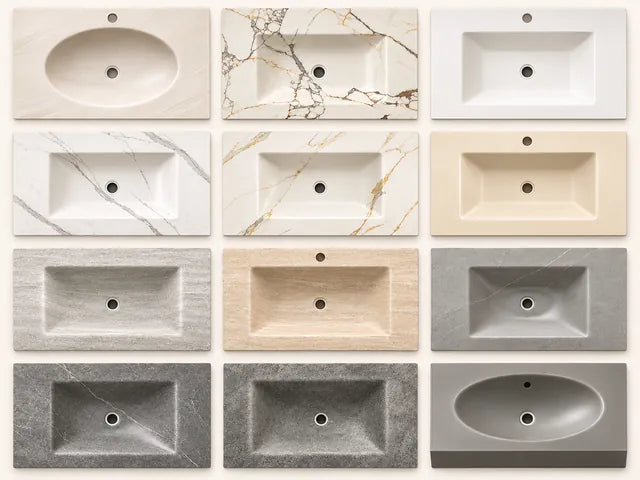
Thermoformed sintered-stone washbasins are one example of a purpose-made system. Funtek’s bathroom range uses a recessed, rounded bowl integrated into a sintered-stone top. This is different from taking an ordinary flat slab to a site and bending it during installation. The finished product and its forming process must be specified together.
Bonded bowls: separate parts can have a smooth finished joint
With a bonded solid-surface assembly, the countertop sheet and bowl begin as separate parts. The fabricator joins the bowl to the top and finishes the transition so that the connection is difficult to see from above. Looking underneath may reveal a flange or joint that the finished upper surface conceals.
Corian’s sink fabrication guidance describes applying joint adhesive to a bowl flange. This explains why “seamless appearance” and “made in one piece” are not interchangeable descriptions. The assembly can have a carefully made bond even when the visible transition is smooth.

Slab-fabricated basins: flat panels form the bowl
A slab-fabricated basin is assembled from cut pieces: side walls, a bottom and the surrounding countertop. Its geometry is often more angular because flat panels meet along joints. The fabricator must resolve those corners, the slope toward the outlet and the junction with the top.
This method gives another way to carry a stone pattern into the basin, but using the same material does not make the pattern continuous. Veins can change direction where one panel meets another. The size and arrangement of the pieces determine whether that change looks deliberate or disconnected.

When comparing this construction with a rounded formed bowl, inspect the internal corners rather than only the countertop. A cloth follows a broad curve differently from a tight junction between panels. Both can be designed well; they are different surfaces to live with and maintain.
Welded stainless steel: a different route to an integrated worktop
A stainless-steel sink can be welded into a stainless-steel worktop and the weld finished to create a continuous assembly. Here, the relationship is between metal parts, not a stone deck and a ceramic bowl. The brushed surface and reflective bowl make the result visually different from a bathroom vanity top.
This is a useful reminder that “integrated sink” covers both bathroom and kitchen products. The joining method, bowl depth and material should suit the room. A kitchen worktop and a handwashing basin should not be selected from appearance alone.

Integrated, undermount, flush-mount and drop-in: where is the rim?
These terms become easier to understand when you follow the same point in each design: where the horizontal countertop meets the sink opening. The comparison below describes the visible relationship. It does not assume that every product with the same mounting label has the same fixings or material.
Compare the edge details. On a phone, scroll the table sideways; select a photo to enlarge it.
| Sink edge | What you see | What it means |
|---|---|---|
 Integrated bowl |
The deck flows into the bowl or meets it through a finished bond. | Choose it for a coordinated surface; inspect the forming or joining method. |
 Undermount |
The bowl sits below the top; the countertop cutout edge remains visible. | Keeps the rim off the upper deck while retaining a separate sink. |
 Flush-mount |
A separate rim sits level with the worktop in a prepared rebate. | Reduces the step at the perimeter but retains a sealed material junction. |
 Drop-in / inset |
The sink flange overlaps the opening and rests above the deck. | A visible rim covers the cutout edge; cleaning must follow its perimeter. |
BLANCO’s installation guide explains that an undermount sink sits beneath the worktop, leaving the cutout edge visible, while a drop-in sink rests on its perimeter rim. A flush-mount installation instead places the rim level with the surrounding top; it still has a junction between two components.
Terminology is not completely uniform between suppliers. Reginox, for example, uses “integrated” for a flush installation. A mounting drawing resolves this ambiguity much better than a product name. Look for whether the rim sits above, below or level with the deck, and whether there is a separate bowl-to-top joint.
A seamless-looking surface does not prove that the basin and countertop were manufactured as one piece. The construction detail determines where the joints are and how the assembly can be serviced.
What changes in everyday cleaning and use?
The practical cleaning advantage of a smoothly integrated bowl is at its perimeter. You can wipe the surrounding deck toward the basin without meeting a raised sink rim. Where the deck curves into the bowl, a cloth can follow that curve instead of working around an exposed cutout edge.
That advantage is local, not a promise that the whole sink is maintenance-free. Soap can still collect around the drain, water can leave deposits and a fabricated bowl still has internal joints. The faucet base and the connection to the wall also remain separate details. Removing one perimeter edge does not remove every place that needs cleaning.

The bowl shape matters as much as the mounting style. Broad internal curves give your hand room to follow the surface. Tight square corners require more attention. A large, relatively flat bowl bottom also needs an effective drainage slope; a generous opening by itself does not tell you how well water travels to the outlet.
Appearance brings another trade-off. A matching top and bowl reduce visual interruptions, especially in a small bathroom. However, if you deliberately want a contrasting stainless-steel or ceramic sink, a separately mounted bowl gives you that contrast without asking two materials to look identical.
For cleaning products, follow the instructions for the actual material and finish. Do not transfer an abrasive-cleaning or refinishing method from acrylic solid surface to a patterned sintered-stone basin simply because both are described as integrated. The surface treatment and the way colour or pattern is formed are different.
Choose the material and bowl for the room
Bathroom vanity: handwashing, counter space and the faucet
A bathroom basin is used alongside items such as soap, toothbrushes and toiletries. The useful layout therefore includes both the bowl and the dry space around it. A wide countertop with a compact bowl may be more useful than a larger bowl that leaves nowhere to put those items.
The faucet needs to work with that geometry. Its reach is the horizontal distance from its mounting position to the outlet. A spout that ends too close to the back wall of the bowl can make handwashing awkward even when its mounting hole fits. Height, outlet angle and water flow also affect where the water lands; hole diameter alone cannot establish compatibility.

Funtek’s sintered-stone washbasin collection gives a specific bathroom example: matte tops with integrated bowls, three standard overall sizes and options for custom layouts. Start with the space available and the bowl arrangement, then compare finishes. Colour selection cannot resolve a mismatch between the top and the cabinet below it.
Kitchen: cookware, heat and repeated food preparation
A kitchen sink must accommodate the things you wash, not just your hands. A bowl that looks wide in a photograph may still be too shallow for a stockpot or too short for a baking tray. Consider the internal usable space, the faucet position and how items can be turned inside the bowl.
Material care becomes especially important around hot cookware and boiling water. Corian’s care guidance includes specific precautions for heat and boiling-water taps. Those instructions belong to that material system; an integrated appearance does not make every basin heat-proof.
A bathroom washbasin specification is therefore not a kitchen specification. Choose a kitchen-rated assembly with the relevant care and installation instructions. For a bathroom, choose the bowl and countertop proportions that fit the vanity and the way it will be used.
Understand the dimensions before choosing a vanity top
Three different measurements are often confused: overall countertop size, bowl opening and vertical bowl depth. They describe different parts of the same assembly. Countertop width and depth determine the footprint on the cabinet. The bowl opening describes the washing area in plan view. Vertical depth describes how far the bowl drops beneath the top.
For example, Funtek’s Calacatta Gold washbasin has standard overall sizes of 800 × 500, 1000 × 550 and 1200 × 600 mm. All three use a 550 × 340 mm bowl opening. Moving from the smallest to the largest top adds surrounding countertop area while leaving the standard bowl opening unchanged.
With a centred 550 mm-wide opening, the difference between overall width and bowl width leaves 125 mm on each side of an 800 mm top, 225 mm on a 1000 mm top and 325 mm on a 1200 mm top. These are plan-view distances from the bowl opening to the outer edges, not guaranteed flat storage areas: the curved transition and other details affect how much space an object can actually occupy.
The same product specifies a 15 mm slab thickness and a 140 mm vertical basin depth. These numbers are not competing descriptions of thickness. The first concerns the top material; the second concerns the bowl cavity. A front apron can also make a vanity look thick without turning the whole countertop into a solid block of that height.
The Ø35 mm faucet opening and Ø45 mm drain opening are hole diameters. They do not describe faucet reach, water flow or the size of the complete waste-pipe assembly. Fittings need to match the openings and leave enough room beneath the bowl for their fastening hardware.
Choose the bowl position before finalising the cabinet drawers. The basin and drain occupy space inside the cabinet, even when the countertop looks thin from the front.

The installation drawing should show the bowl underside, drain position, support and nearby cabinet rails. A drawer that fits under the flat part of the top may collide with the bowl or trap. Leaving access to the drain connection also allows servicing without dismantling the cabinet unnecessarily.
Can an integrated basin be repaired or replaced?
First separate a surface problem from an assembly problem. A superficial mark, a crack through the basin and a leak at the waste fitting are different faults. Water underneath the vanity does not, by itself, prove that the bowl has failed; the drain connection and supply plumbing are separate components.
Repair options depend on the material. Some solid-surface damage can be professionally refinished; Corian directs owners to an authorised retailer for stubborn cuts or scratches. That does not mean sanding is a suitable remedy for every integrated basin. A patterned mineral surface can require a different repair assessment, especially where damage reaches an edge or a joint.
Replacement depends on how the bowl is attached. A bowl formed into the top cannot simply be unclipped like a separate drop-in sink. A bonded or fabricated assembly may allow specialist work, but access, the remaining countertop and the original joining method determine what is practical. Avoid assuming either that the entire counter must always be replaced or that every integrated bowl is independently removable.
Cosentino’s Integrity installation manual distinguishes installation configurations and their support requirements. This is why a joint detail and accessible cabinet space matter beyond the first installation: the finished appearance alone cannot explain the service route.
If easy future bowl replacement is a priority, compare a separate sink installation with the proposed integrated assembly before ordering. Ask what would actually be removed, which parts can be retained and whether the work can be done with the countertop in place. Those answers are more useful than a general claim that a sink is “repairable.”
Compare the complete price, not just the word “integrated”
A price for a standard manufactured top and a price for a custom fabricated worktop describe different amounts of work. Bespoke dimensions, bowl position, panel joints, edge details and site installation can change what is included. A quote for the top alone should not be compared directly with a fitted vanity package.
For a concrete reference, Funtek’s Calacatta Gold standard tops are listed at US$150 for 800 × 500 mm, US$180 for 1000 × 550 mm and US$204 for 1200 × 600 mm, checked on 29 October 2026. These are EXW China prices per piece for the countertop, integrated basin and drain assembly. The faucet and cabinet are separate, and shipping is quoted by quantity and destination. They are not installed bathroom prices or a market-wide price range.
For your own comparison, keep the same overall size, bowl layout and supply scope on both quotations. Then compare the construction and finish. A lower price that excludes the cabinet, drain or installation may still be the right offer, but you need to know which part of the finished bathroom it buys.
Once you understand the construction, choosing becomes more concrete: identify the room and washing task, fit the bowl and top to the available space, and compare the finish and complete supply price. You can then judge an integrated countertop by how it will function, rather than only by the uninterrupted surface in a photograph.
Find a washbasin top for your bathroom
Tell us the countertop width and depth you need. Funtek can provide suitable standard or custom washbasin options and a quotation. Add the quantity and delivery destination when available.